|
|
||||||||||||||||||


|
|
Outrider's Nite Techniques |
 09-18-2006, 08:24 AM
|
#1 |
|
aka 'Paul WS Anderson' ;)
Offline Posts: 7,751
 -->
-->
Join Date: Jul 2005

|
*I'm posting this for Outrider*
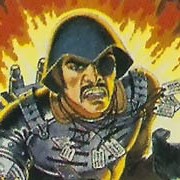
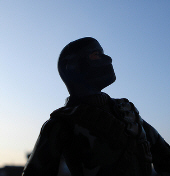
In this forum Ill explain some simple lighting techniques I use that may help you to create pictures that arent taken in natural daylight. This includes not only night shots, but night vision effects and shots that look as if they are illuminated by a flare as well. Firstly you need to set your camera up correctly. You need to make sure the flash is turned off, and as most dimly lit pictures are reasonably tight shots, youre better off with the macro function switched on. Most times I dont change the shutter speed or aperture. My camera does have a low light setting, but I dont use it because it lengthens the exposure time and therefore requires use of a tripod to prevent blurring. The second thing you will need is an artificial light source, unless there happens to be a particularly bright full moon! For standard night shots I use a small portable fluorescent work light which cost less than ten dollars at my local hardware store. Fluorescent light has a cool, even look, which looks just like real moonlight in photos. Whilst I was there I also bought a small headband mounted flashlight which has not only a standard white beam, but also has a very bright red beam as well, which is useful if you want a scene to look as if it is illuminated by a flare (pic 1).  Once you have your figures and/or vehicles set up you are ready to start snapping. Ideally ask someone to hold the light for you so both your hands are free for the camera. All you need to decide now is what angle you want the light to come from, and how bright you want the shot to look. You can have the light down low and in front of the subject (pic2) for a dramatic look, or above and in front of the subject for a shot which will show some detail on the subject (pic 3), or above and behind the subject for a silhouette effect (pic 4).    You can even get tricky and have the light source between subjects for multiple lighting effects in one picture (pic 5).  Last edited by Sonneilon : 09-23-2008 at 06:13 PM. |

|
|
09-18-2006, 08:24 AM
|
#2 |
|
aka 'Paul WS Anderson' ;)
Offline Posts: 7,751
-->
Join Date: Jul 2005
|
*cont'd*
For a brightly lit pic, hold the light fairly close to the subject (pic 6) or further away for a darker pic (pic 7). As a rule, the lighter a picture is, the more detail you will see, and the darker a picture is, the moodier it will look.   For the flare illumination effect, simply follow the above tips, but use a coloured light source. The difference between fluorescent light and coloured light can be seen in same scene photographed under different light sources in the two shots below (pics 8 & 9).   You may be able to achieve a similar look to pic 8 by using a filter if you have some decent photo editing software. You will also need this if you want to achieve a night vision effect. Simply take a shot as explained above (Ill use pic 2 from above), then use your software to change it to black & white, then tint it with a light green shade, and finally add a little noise and blur to make it look grainy (pic 10).  Finally, after you have taken your pics you may find you want to use your photo editing software to adjust the brightness and contrast functions just to fine tune them a little. Now, get out there in the dark and remember to HAVE FUN! Last edited by Sonneilon : 09-23-2008 at 06:14 PM. |
|
|
|
09-18-2006, 01:57 PM
|
#3 |
|
Veteran
Offline Posts: 3,665
-->
Join Date: Dec 2005

|
Oh, man....you're giving me ideas again! The diabolical little wheels are turning!
Great article! Gave me lots of ideas on new and awesome effects! |
|
|
|
09-19-2006, 01:06 PM
|
#4 |
|
Self-Important

Offline Posts: 1,034
-->
Join Date: Jan 2006
|
Great effects. Thanks for sharing the technique. I look forward to using them myself.
|
|
|
|
09-22-2006, 01:30 PM
|
#5 |
|
Veteran
Offline Posts: 843
-->
Join Date: Feb 2005
|
The lighting is tight in these (especially pics 3-8). When get back in the saddle, I will almost certainly use fluorecent lighting. Looks like Michael Mann-ish.
 |
|
|
|
04-14-2007, 01:36 PM
|
#6 |
|
It's been a great ride!
Offline Posts: 14,302
-->
Join Date: Jun 2005
|
Another technique I've been experimenting with has given me some interesting results. Instead of buying a heap of different coloured lights, I bought half a dozen sheets of different coloured cellophane to use as filters. That way one light can give you any colour you want.
You can use a single piece for a basic colour or use different combinations to achieve some really strange colours. You can also vary the intensity of the colour by using a single layer of cellophane for a weak tint, or three or four layers for a strong full colured light. It only costs a couple of dollars per sheet, which is a lot cheaper than buying heaps of different coloured lights!
__________________
"The future's uncertain and the end is always near." - The Doors "Roadhouse Blues". |
|
|
Posting for pictures? |
|
09-23-2008, 08:20 AM
|
#7 |
|
Legendary Saboteur
Offline Posts: 2,138
-->
Join Date: Apr 2007
|
Hey,I'm about ready to do a few night time shots in my dio.. mainly ones involving night vision and a scope.. my problem is that I don't quite know how to get the circular bits around the edges that you see in some shots.
I got to the stage where I've darkened the image and used the Gamma to increase the green visual.. I now want to add the middle horizontal vertical thing and the distance measurements in the corner to make the shot look good.. so how do you get the picture to appear or seem to appear behind the black circular viewfinder? I'm assuming it's photo editing and something to do with layering.. btw those pictures have disappeared above.. 
__________________
My Sites Eternity Toys Superiorville Toy blog Urban Saboteur Stories Social Sites & Communities Flickr Tweet Me |
|
|
|
09-23-2008, 10:17 AM
|
#8 |
|
aka 'Paul WS Anderson' ;)
Offline Posts: 7,751
-->
Join Date: Jul 2005
|
They didn't disappear. Ok, they did. I was cleaning up my photobucket albums. If you guys really want, I THINK I can repost them.
|
|
|
 |
«
Previous Thread
|
Next Thread
»
| Thread Tools | |
| Display Modes | |

 Hybrid Mode
|
|

Powered by: vBulletin Version 3.0.6
Copyright ©2000 - 2026, Jelsoft Enterprises Ltd.
Style Design By: vBStyles.com
Copyright ©2000 - 2026, Jelsoft Enterprises Ltd.
Style Design By: vBStyles.com