|
|
||||||||||||||||||


|
|
Creating a Diorama, step-by-step |
 01-24-2008, 08:59 PM
|
#1 |
|
Smack-Talking Ninja
Offline Posts: 581
 -->
-->
Join Date: Jan 2008
|
Hey There!
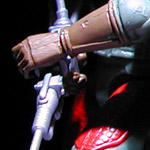
I decided that before I start taking some pictures, having a schweet backdrop would be mucho helpful. Instead of using an existing playset or some plain "printed" backgrounds, my son and I decided to make a Ranger Station diorama (to be used for all sorts of violent gijoe happenings ;-) It will consist of a building with bricks & wood. It will have an inside and an outside. We will also have a surrounding area made from gravel, wire fences and possibly some lighting. So with this thread, we will keep updating our progress for your viewing and fanciful pleasure. Keep in mind that I have never done anything like this (even remotely) before so please feel free to raise any comments or questions. Let's get started... Here's the general overview. I cut the building from cardboard, covering all edges with masking tape. It will consist of a door, window (far side) and a blast hole. Firefly checks out the progress.  The bottom half of the building will consist of brick. I looked at a few craft stores for something to use as bricks, but everything I saw either sucked, or was too expensive. So I decided to use balsa wood. $1.89 per 4 foot segment (0.5cm x 1cm). I'll cut the brick to size. Not sure what I'll do about the texture/paint to make them appear like bricks, but bah... whatever - I'll sleep on it.  Here I'm using an xacto razor saw (crazy sharp - zinger!) and a jig setup. I cut each block at 2cm. Looks relatively in scale to a 1:18 cinder block. Woot! This took awhile but was rewarding. Cutting stuff is exciting ;-)  I applied auto rust primer to the whole structure. This was to mainly hide the look of masking tape on cardboard... plus it provides a good solid base color between the bricks in the final product. Used standard tacking glue from a craft shop to apply the bricks. I was stressing over placing the bricks on completely uniformly (distance between, gap etc)... but in the end decided that some ad-hoc uneven blocks add to the character and don't look craptastic.  Painting - I test painted a bunch of bricks. Used acrylic paints... looked too plain - then tried adding some dark hand-painted edging which looked too cartoony. I then tried using a sponge to add a darker color, but the sponges I have didn't add enough finite detail... so I used some stone-textured spray paint. Looks good I think ;-) This is the very first coat, so I'll apply a lighter coat to catch any unhit areas next.  So that's where I'm at after 2 nights of messing around. Next comes the top half which will be wood slats. I'll be doing a wood transition ledge between the bottom bricks and the top wood slats. And I plan on making a full doorframe and windowframe etc. Anywho, comments welcome. Have at her! Cheers! ~ Paul. |

|
|
01-24-2008, 09:03 PM
|
#2 |
|
aka 'Paul WS Anderson' ;)
Offline Posts: 7,751
-->
Join Date: Jul 2005

|
HEY! Thanks for doing that because I wasn't about to go into a how-to-make-bricks step along. However, unlike cutting 'em up, I'd buy 'em from my store or hobby store. I believe the equivalent would be roof tiles for doll houses.
 |
|
|
Update! |
|
01-24-2008, 09:08 PM
|
#3 | |
|
Smack-Talking Ninja
Offline Posts: 581
-->
Join Date: Jan 2008
|
Quote:
Just applied a heavy second coat to the bricks with the stone-texture spray paint, and wow it looks fantastic. I went with Balsa wood mainly because it's crazy easy to cut to fit. When I was applying the bricks to the main cardboard structure, I was custom cutting pieces often ;-) I'll post some pics once the paint application is dry. Cheers! ~ Paul. |
|
|
|
|
01-24-2008, 09:55 PM
|
#4 |
|
To old to play with toys!

Offline Posts: 5,962
-->
Join Date: Oct 2007
|
Man thats gonna look hot!
__________________
 "It ain't about how hard you hit, but how hard you can get hit, how much you can take and keep moving forward - thats how winning is done!" Rocky Balboa
|
|
|
|
01-25-2008, 06:32 AM
|
#5 |
|
Hell hath no fury....

Offline Posts: 7,646
-->
Join Date: Dec 2006
|
Most Excellant 'How-To'!!!!!!!!!
__________________
Non illigitamus carborundum~Vos mos non effrego mihi  Coming soon: 'JoeSpecialOps' |
|
|
|
01-25-2008, 10:08 AM
|
#6 |
|
Think For Yourself
Offline Posts: 4,185
-->
Join Date: Aug 2007
|
This is really cool! I might have to try this for brick work. I'm looking to delve a bit further into the worlld of set building. Awesome stuff, man!!!
__________________

|
|
|
 |
«
Previous Thread
|
Next Thread
»
| Thread Tools | |
| Display Modes | |

 Hybrid Mode
|
|

Powered by: vBulletin Version 3.0.6
Copyright ©2000 - 2026, Jelsoft Enterprises Ltd.
Style Design By: vBStyles.com
Copyright ©2000 - 2026, Jelsoft Enterprises Ltd.
Style Design By: vBStyles.com