How-to Dios
Sonneilons style of doing dios.
This is how I do things. NOT that you have to, but you gotta know that a lot of people do worse 1. Have an idea in your head of a story. I dont script it out. Thatd be too much like writing for me. 1a. Consult with friends whether the concept is sound or just lame. When you start shooting, bounce off teasers to gauge reaction. 2. Pick your characters. The characters need to cater to the story. IF you want a story in the jungle or desert, you probably dont need WINTERIZED soldiers running around. Also, dont try to do too much. If you are doing said scenario, dont throw down ARCTIC scenes unless you REALLY know what you are doing. 3. Find locations to shoot. Ive skateboard and snowboarded for over 20 years. Its no secret that us boarder-types see the world differently. Walk by a bank (slanted hill; concrete), you might think nothing of it. But Ill want to hit that on a skateboard. Same with snowboarding. We see kickers where the average skier wouldnt. The MORE exotic the location the better. 3a. Get used to manipulating the viewers perspective. What might look like a crap location, close in on it and make it believable as something entirely different. Scale comes into play. Sometimes, the scale wont work. What looks great for 8 (Sigma6) wont work for 1/18 inch and etc. Ive run into this many times where I find THE greatest spot just for it to fail for one of the scales. 4. Understand basic photography. Shoot under the manual settings so you can play with framerate and whatnot. THIS can turn a yellow picture from indoor shooting in a natural light setting. The slower the framerate, the more real it looks. Faster framerates mean there is more light available. 4a. Understand that cropping can change the feel and look of the shot. Do you REALLY need all that extra stuff in the shot? This falls under manipulating the shot. I believe it was the 1st part of HUNT FOR SONNEILON where I shot under a foot bridge. I didnt let the viewer see what wasnt needed so it looked like the old metal factory that I wanted. For the Crankcase & Lady Jaye part of HUNT, I made sure NOBODY saw what I was really shooting on! 4b. Understand perspective. Take MULTIPLE damn shots! From various angles. Dont POST every damn angle. Use the best one. 5. If the shot is to your liking, you crop the shot to what you want. THEN you resize. Resize something manageable. What good is a 600x800 shot if it has a ton of crap you dont need? Is it a scenery shot or a close up? Wheres the focus of the shot??? RESIZE!!! 5a. If you are using Comic Book Creator (CBC), it can be difficult. All I know is that the edition I had was crap. All my shots were 1000xWhatever. The CBC would do all the work BUT you gotta try and put that shot into a specific sized frame which means, you can lose a lot that you want to keep due to CBC cropping the shot before you! 5b. If you are working with just normal shots viewed thru Windows Slide Show (like me), then you gotta know that you gotta play with picture size. 600x800 is USUALLY the largest. To make the viewer scroll around, its not fair cuz the viewer loses the energy and the feel of the shot. My large shots are 600x800 and then I work smaller! THIS way of working is AGAINST the average manipulator because a lot of people like to work with a LARGE palette when adding fx and whatnot. I like to work on a small scale and this is why 5c. IF the shot is too dark, try lightening it. If its too light, darken it. Play with brightness and contrast. Some shots can be saved this way. However, you want to keep a certain consistency in the story and if comes from light to dark to light with no reason Well, you just lost the viewer. 6. This is up for discussion. Throw down effects first or throw in the word balloons? I personally do word balloons first cuz the story has to come first. We arent animated and we arent quite comic. We are using figures that have static facial expressions which means, unless you are GOOD, you cant tell anger from sadness on a figure (easily). I do STORY and monologue/dialogue first then effects. Or I junk the text and just do action. BTW, this also includes when you cut n paste stuff to create a whole new shot 7. THIS part is really tough. KNOW what you are gonna use for text in the shot. CATER the cropping and sizing to what needs to be said. There is nothing worse than making the shot too small to make the word balloon work right. MAKE the balloon size to what you think will work for you. Too often, us viewers see word balloons TOO BIG for the text involved. I tend to throw down what I ASSUME is about right and then fill it up. Get used to adapting to making things work. It is very annoying and frustrating and THAT is the ONLY reason why a script is needed. My dios can be very wordy because Im trying to get a lot of information across. BUT at times, I make the balloons too big and being too lazy, I wont go back to the original shot and fix it. Ill fill the balloon up instead. At the same time, I havent made balloons big enough! 7a. Keep in mind, DONT let the word balloons cover TOO MUCH of the character speaking OR the action. Comic books often have this problem, not us dioists. I admit, Ive had to cover up MORE of the figure than I like on many occasions. 8. USE a consistent TEXT size. I tend to use a 10pt. IF they are shouting, Ill use capitals. IF its that emotionally charged, then yes, go bigger. But dont do 10 pt in 1 frame and then 18 in another. It makes no sense and throws off the reader. TRY to use the same FONT too. PICK ONE! I use Comic Sans MS for all talking. Bookman Old Style for explosions. And if the character is weird (like Zartan), Ill use Chiller. I try to keep myself limited on FONTS to keep things consistent. (My Overkill uses Chiller too) 9. Once you get the whole text balloon thing figured out, then deal with effects. I cant go into detail about this because this is a whole nother area. Its about a toy figure kicking another. Or punching. Or the blades of a helicopter. Whatever. Dont look at me. Im still learning. This is from cut n pasting on to a new background to adding lighting effects. 10. Get used to SAVING a lot. Layers? EACH text should be a separate layer. EACH fx addition should be a layer. 11. Lets get anal here. Some say, SAVE YOUR ORIGINAL SHOTS! Some say, SAVE YOUR LAYERS! I dont know. Not usually. If Im done with the shot, Ill lose the originals. I almost NEVER save the layers. 11a. Create a SPECIFIC folder for your dio. Create a specific folder for 1-shots. Dont lose your work in a folder you cant remember. Keep a MISC, UNUSED, ORIGINAL and FULL folder. FULL refers to the actual dio and nothing else. 11b. NUMBER the damn shots! If you dont number them right off the bat, are YOU going to remember which shot is which months later??? How about sending them to someone out of order? 11c. Title pages are nice. Depending on how you want your work I have a page that has WHO did it, then the title page then the story. For those of you who got an actual copy (as opposed to viewing it on the internet), Sonneilon Studios Presents GI Joe is actually the 1st shot. Ive done more complicated versions in the past and trust me, its a headache. 11d. Find someone who can host them OR use a free hosting site. IF you use a hosting site (photobucket.com), then make a specific album for the dio. Otherwise, anything else in that album could get lost in the shuffle. Wheres the story start or end before we run into OTHER pictures that have NOTHING to do with the story??? 12. These are just basics of doing a dio. How you end up doing it, its all you. But just know, these are pretty normal methods and just following this little list, itll turn a not-so-hot dio into a pretty nice. Remember, its mostly about manipulation of the viewers eye. Fool the viewer into what you want them to see. Just like the Harry Potter movies & books! |
1. Have an idea in your head of a story. I dont script it out. Thatd be too much like writing for me.
i do the idea thing, but most times i write the whole script. its easier when you go and add the speech and i know exactly what pics i will need and what angle. but i have done them by just having an idea too. 1a. Consult with friends whether the concept is sound or just lame. When you start shooting, bounce off teasers to gauge reaction. i cant do this because then they would say dont use sci-fi, lol 2. Pick your characters. The characters need to cater to the story. IF you want a story in the jungle or desert, you probably dont need WINTERIZED soldiers running around. exactly, i did a lot of customs for my winter scene, that and use joes that already had winter looking gear. the same will be for my future desert dio, 4a. Understand that cropping can change the feel and look of the shot. Do you REALLY need all that extra stuff in the shot? so true. 95% of my shots are long range shots, then i crop them to use what i need from the scene. 4b. Understand perspective. Take MULTIPLE damn shots! From various angles. Dont POST every damn angle. Use the best one. i honestly think this is the most important part of doing dios. i only use about 1 out of 8 shots. 7a. Keep in mind, DONT let the word balloons cover TOO MUCH of the character speaking OR the action. Comic books often have this problem, not us dioists. I admit, Ive had to cover up MORE of the figure than I like on many occasions. i think i try this to much, i really try not to cover any of the figure whatsoever. 8. USE a consistent TEXT size. YOU TALKING ABOUT ME!?! next thing you'll want correct spelling... seriously, i do use the same word font, but i usually do some more cropping after words, and not all of my pictures are the same size so they dont show up the same size so i have to guess. 11. Lets get anal here. Some say, SAVE YOUR ORIGINAL SHOTS! still have everyone of mine, even a lot of shots i didnt use. 11a. Create a SPECIFIC folder for your dio. Create a specific folder for 1-shots. Dont lose your work in a folder you cant remember. Keep a MISC, UNUSED, ORIGINAL and FULL folder. FULL refers to the actual dio and nothing else. 11b. NUMBER the damn shots! If you dont number them right off the bat, are YOU going to remember which shot is which months later??? How about sending them to someone out of order? this should go without saying. 11c. Title pages are nice. yes, i like doing my title pages. not to brag but i think mine are actually pretty nice. |
Love this - most are so called "no-brainers" but people forget (me especially) so its nice to have a "guide" of sorts lying about.
|
You helped me BIG time G!
|
Quote:
Try doing the text first, then make the balloon. I find it a lot easier to do that way. |
I made a "how to" on the story part of a dio -
just something to get peoples creative juices flowing somewhat (or give them a starting point.). I'm thinking along the lines of people who disregard a story completely - or don't know how to set it up from the start (as its easy to have some things, or some parts of the story nicely in your own noggin' and forget that the rest of the world doesn't know what's going on behind the scenes of your very own joe verse). Jumping right into the action is something I feel could be called a beginners mistake (I know I've made it with my mini-dios, but they were meant as such anyway). For a fullblown dio people should have a story in mind that they want to tell. - Hope my ramblings help on that part. |
Please add your own thoughts to the whole shebang. This is just how I do things which works and sometimes, doesn't. lol I meant to say that earlier.
It would make sense to do text first then balloon, but I use WHITE balloons. So if I put the balloon over top, it'll layer the white on top making the text disappear. Hey, I'll say use Sci-Fi! Wait, the concept or the character??? |
Quote:
Try creating a separate layer to draw balloons on and place it under the text layers. (Not sure what your options for layers are in the program you use. I'm using Photoshop.) |
Photoshop has word balloons???
|
Quote:
No, it doesn't. :( I draw the balloons myself in Photoshop on their own layer. Only takes ten seconds to do, quick and easy. I prefer to draw them myself instead of using a circle tool because you can get the balloons tighter around the text, leaving less white space and it covers less of the photo. They're a little rough but I like the hand-drawn look. |
Well, I hadn't thought of that! Hmmmmm... I might have to try that! Thanks!
|
Quote:
YES IT HAS. Check my pictures! Check this picture, it's a simple guide to word ballons. I know it is in Spanish but it should be the same in English. Hope it helps. 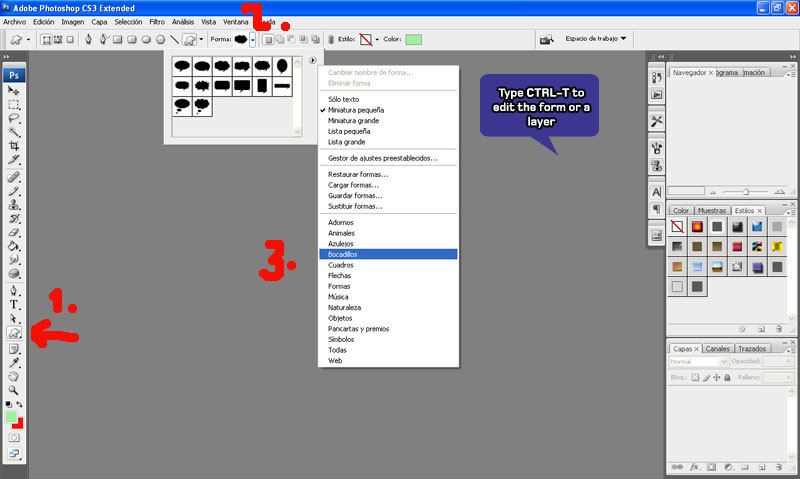 Try decreasing the opacity of the ballon layer, it is useful when the ballon covers part of the picture. |
Quote:
That's a convenient addition to Photoshop. Looks like it's time for me to upgrade. |
Quote:
I dont think you need an upgraded... your version should have it. |
rambo, i knell down before you. i have had photoshop about a year and half, i have saw the balloon thing, but totally forgot about it and never used it. im torn between feeling good because now i know(and knowing is half the battle) and feeling stupid...
|
Quote:
I can't believe I couldn't find that. :rolleyes: |
Quote:
Just knell a little. I have had PS for years. Just this year someone else taught me about the word ballons. Now I want to learn how to erase backgrounds smoothly... |
Quote:
Have you tried using Layer Masks with the brush tool? |
Quote:
:confused: nope :confused: I have only used the magic tool and the eraser with awful results.... how do I do that? |
Quote:
Depending on what exactly you ar etrying this can be easy. Eraser (when you ajust the size and brush so that it doesn't do that "fade' effect) is a good option. If you are going for a straight up take something from one pic and put it on annother the extraction tool might be what you need (right under filters). The pain about is for one thing once you zoom in you can't zoom back out (or if you can I haven't figured it out). Also to make it smooth you need to have a large pic with a small line drawn (no more than 2 pix, Try for 1 where you can) and if you miss one little pixal you will have to look through it to try to fill it in, then you will get your relitivly smooth extraction. If you make the lines too big you will have pixalation and the image will look like crap. On an added note if you want a quicky way to do a really fast motion blur on a vehcile or figure use the extraction tool and the "force forground" effect, once you chose the color you want click preview and it will extract only that color, afte that just add the blur and you are set.. It's what I use with superman in toxie and it works great. Also that technique is gold for fire, muzzle fashes, boat wakes, diver bubbles, there are tons of applications with it. |
LAYER MASKS (Photoshop)
Never use the Erase tool, anything you want to do with the Eraser can be done better with Layer Masks. Layer Masks give the same effect as erasing but when you erase something it's gone, with Layer Masks you can always get the image back. This is bare-bones to get you started, experiment to see what happens. Let me know if you have any follow up questions (Im not too good at explaining things). Select the Layer you want to work with (doesn't work on Background layer). Click "Add Layer Mask" on bottom of the Layer Pallet. Click the Mask Thumbnail that appears next to the Layer Thumbnail. Select Brush Tool and a brush with 0% Hardness. - Use small brush for crisp in-focus areas. - Use large brush for soft out of focus areas. (Experiment to get the right size.) Use black to erase. Use white to un-erase (this is what makes Masks great). |
Quote:
Actually you could just hit step backward until you did, bit of apain but it works. The major difference I have noticed between eraser and mask is the eraser does tend to have a "Faded" edge if certain brushes are used. other than that really it feels like an extra step. I have played around with them extensively and this is the conclusion I have arrived at, then again everyone is different and has different preferences to how to do things. |
Quote:
Have to disagree with you on this one. You can only sept backward a limited amount of times. And if you save and quit to come back to work on the file another day you can't sept backwards at all. Once something is erased, it's gone forever. With Masks, if you make a mistake or change your mind about what you want to do, you can always un-erase any part of the image at any time. The only extra step is clicking "Add Layer Mask". Give Masks another try, they're worth it. :D |
I always ERASE! What I'm getting rid of, I could care less most of the time!!! :P But I figure the concept of erasing is for a whole 'nother lesson.
|
|
Quote:
This point can be argued back and forth and nothing will be accomplished, the fact is what works for one person doesn't for another. after EXTENSIVE trials with masks I found that erasing is more to the point, that is my personal preference. Masks are perfectly valid as well, but also have thier flaws just like erasing does. There will be something you can do with masks that can't be done with an eraser and vice versa. But to belabor the point any further would be a practice in futility. Both options are out there and its up to the individual to deside what they prefer. |
Now I think about this debate, my CG buddy who did a bunch of effects for me in the past said, "Just erase what you don't need."
|
| All times are GMT -7. The time now is 05:42 PM. |
Powered by: vBulletin Version 3.0.6
Copyright ©2000 - 2025, Jelsoft Enterprises Ltd.